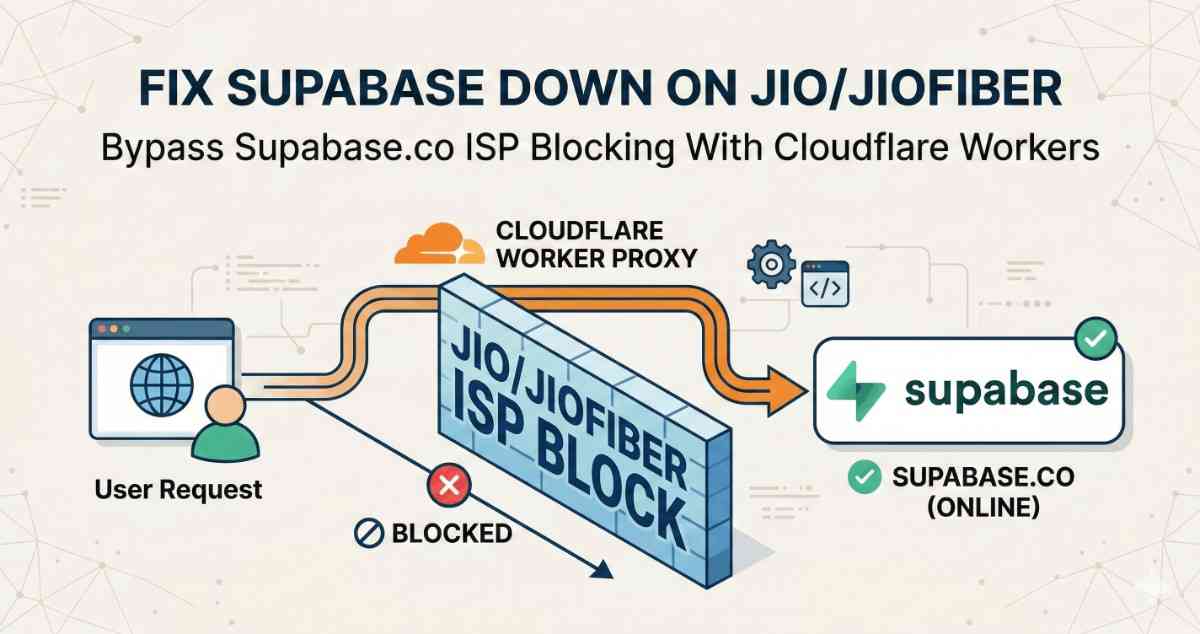
If you are using supabase in your application and everything works on Airtel, Wi‑Fi and VPN – but Jio and JioFiber users in India keep saying “Supabase is down” or “Google login isn’t working”.
In reality, Jio is silently blocking *.supabase.co from the browser. In this guide, we’ll show exactly how to put Supabase behind your own api.yourapp.com domain with a Cloudflare Worker proxy, switch Google auth to an ID‑token flow, and stop Jio’s ISP‑level block from breaking your Supabase app.
The common pattern: every call that hit *.supabase.co from the browser either hung or failed with network errors.
This guide explains:
1. What’s actually broken (it’s not Supabase itself, it’s ISP‑level blocking of *.supabase.co).
2. Who is affected (any app that calls Supabase directly from the browser, especially with Google OAuth).
3. How we fixed it by putting Supabase behind our own domain via a Cloudflare Worker proxy and switching Google auth to an ID‑token flow so the browser never has to talk to supabase.co directly.
4. Step‑by‑step instructions you can follow to apply the same fix to your project.
1. The problem: Jio is blocking supabase.co, not your app
In a typical Supabase setup, your frontend talks straight to Supabase:
- Auth: https://<project>.supabase.co/auth/v1/*
- Database REST: https://<project>.supabase.co/rest/v1/*
- Storage: https://<project>.supabase.co/storage/v1/*
- Edge Functions: https://<project>.supabase.co/functions/v1/*
Supabase is healthy, but Jio / JioFiber appear to block *.supabase.co at the DNS or network level. That leads to these symptoms for Jio users:
- Supabase auth calls hang or time out.
- Google OAuth gets stuck after choosing an account (the final callback to Supabase never completes).
- API requests in the browser’s Network tab sit on `pending` or fail with `ERR_CONNECTION_TIMED_OUT` for https://<project>.supabase.co/....
Everywhere else (other carriers, home Wi‑Fi, VPN), the same app works fine. Supabase status is green, logs are normal; only Jio users are broken.
So the real issue is:
> The browser is talking directly to *.supabase.co, and Jio is blocking that host.
Our fix is therefore to stop exposing `*.supabase.co` to the browser at all.
2. Hide Supabase behind your own domain
Basically, we will be using api.yourapp.com (any sub domain of your choice) for supabase url in our env file instead of project-id.supabase.co. By doing this, all supabase api calls will happen on server side in cloudflare workers, client browser will never see any *.supabase.co and our issue will be fixed.
The architecture change is simple in concept:
1. Put a Cloudflare Worker in front of Supabase.
- Browser → https://api.yourapp.com/...
- Worker → https://<project>.supabase.co/...(server‑side, not seen by Jio).
2. Point your Supabase client at https://api.yourapp.com instead of https://<project>.supabase.co.
3. Rework Google OAuth on the web so the browser only talks to:
- Your own domain (yourapp.com / api.yourapp.com)
- Google (accounts.google.com)
- And never to *.supabase.co for redirects.
4. Forward the real client IP through the proxy so your Supabase Edge Functions (location + per‑IP rate limiting) still see the right IP.
From Jio’s perspective, your app is now just:
- Making HTTPS calls to api.yourapp.com (your domain), and
- Doing OAuth with accounts.google.com.
Supabase stays hidden behind that layer and is no longer subject to the ISP’s supabase.co block from the browser side.
3. Step‑by‑step: front Supabase with a Cloudflare Worker
3.1 Prerequisites
You should already have:
- A Supabase project, with a URL like https://<project-ref>.supabase.co.
- A Cloudflare account.
- A domain you control (e.g. yourapp.com) in Cloudflare DNS. (If you have a different dns provider like namecheap, hostinger or godaddy, you have to switch it to cloudflare, just ask claude or chatgpt for simple steps for the same, it wont take more than 30 min to do the same)
- A subdomain you can dedicate for the API, e.g. `api.yourapp.com`.
We’ll assume the following:
- SUPABASE_URL = https://<project-ref>.supabase.co (your original Supabase URL).
- api.yourapp.com will be the public endpoint the browser uses.
3.2. Create the Worker and route
In the Cloudflare dashboard:
1. Click on Add on top right and select workers.
2. Then choose the ''Start with Hello World'' method and change the worker name to something like supabase-proxy.youraccount.workers.dev
3. Click on deploy.
4. After deployment, on top right, click on edit code button as shown in image attached below.
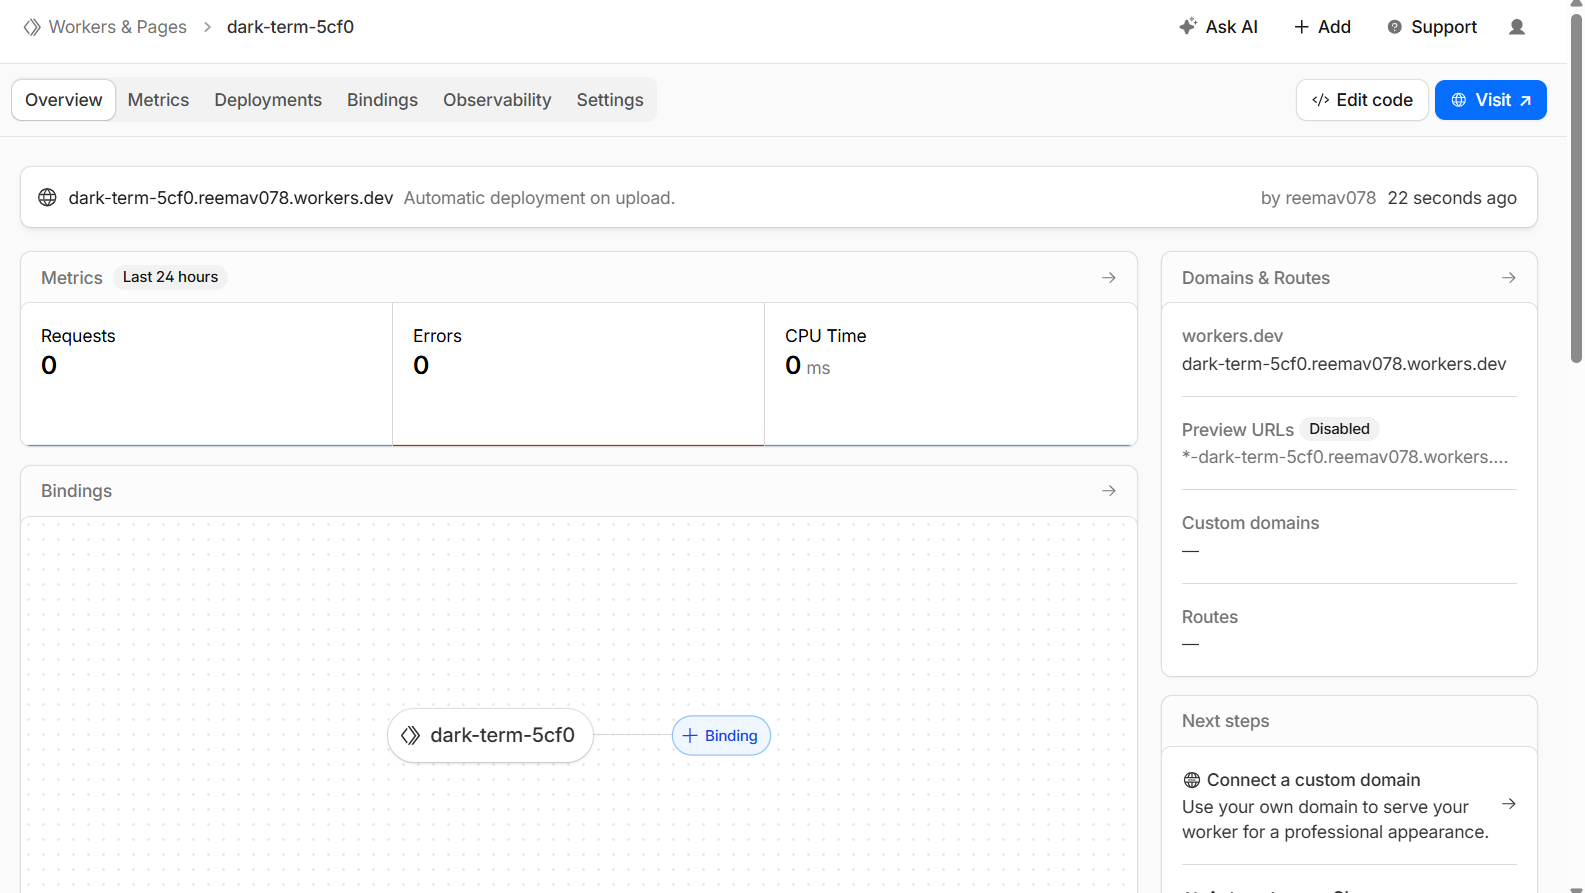
5. You will see worker.js there, delete all the code written in it and paste the code shared below. Worker code: proxy + CORS + real client IP
Use this Worker implementation or mould it according to your need:
/**
 * Supabase Production Proxy via Cloudflare Workers
 * Uses ANON key + preserves user JWT + forwards real client IP
 */

const CORS_HEADERS = {
  "Access-Control-Allow-Origin": "*",
  "Access-Control-Allow-Methods": "GET, POST, PUT, DELETE, OPTIONS, PATCH",
  "Access-Control-Allow-Headers":
    "Content-Type, Authorization, apikey, x-client-info, x-supabase-api-version, accept-profile, content-profile, range, prefer, x-client-ip",
  "Access-Control-Max-Age": "86400",
};

export default {
  async fetch(request, env) {
    // Handle CORS preflight
    if (request.method === "OPTIONS") {
      return new Response(null, { headers: CORS_HEADERS });
    }

    try {
      const url = new URL(request.url);
      const targetUrl = `${env.SUPABASE_URL}${url.pathname}${url.search}`;

      // Create clean headers to forward to Supabase
      const headers = new Headers();

      // Always set anon key
      headers.set("apikey", env.SUPABASE_ANON_KEY);

      // Preserve user JWT if present, otherwise fall back to anon
      const authHeader = request.headers.get("Authorization");
      if (authHeader) {
        headers.set("Authorization", authHeader);
      } else {
        headers.set("Authorization", `Bearer ${env.SUPABASE_ANON_KEY}`);
      }

      // Forward content-type if present
      const contentType = request.headers.get("Content-Type");
      if (contentType) {
        headers.set("Content-Type", contentType);
      }

      // Forward Accept and PostgREST-related headers so behaviors (single vs array, profiles, etc.) are preserved
      const accept = request.headers.get("Accept");
      if (accept) headers.set("Accept", accept);

      const acceptProfile = request.headers.get("accept-profile");
      if (acceptProfile) headers.set("accept-profile", acceptProfile);

      const contentProfile = request.headers.get("content-profile");
      if (contentProfile) headers.set("content-profile", contentProfile);

      const prefer = request.headers.get("Prefer") || request.headers.get("prefer");
      if (prefer) headers.set("Prefer", prefer);

      const range = request.headers.get("Range") || request.headers.get("range");
      if (range) headers.set("Range", range);

      const apiVersion = request.headers.get("x-supabase-api-version");
      if (apiVersion) headers.set("x-supabase-api-version", apiVersion);

      const xClientInfo = request.headers.get("x-client-info");
      if (xClientInfo) headers.set("x-client-info", xClientInfo);

      // Extract the real client IP from Cloudflare and send it in a custom header
      const clientIp =
        request.headers.get("CF-Connecting-IP") ||
        (request.headers.get("x-forwarded-for") || "").split(",")[0].trim() ||
        request.headers.get("x-real-ip");

      if (clientIp) {
        // Custom header we read in edge functions
        headers.set("x-client-ip", clientIp);
        // Optionally still set these, but edge code will prefer x-client-ip
        headers.set("x-forwarded-for", clientIp);
        headers.set("x-real-ip", clientIp);
      }

      const response = await fetch(targetUrl, {
        method: request.method,
        headers,
        body:
          request.method === "GET" || request.method === "HEAD"
            ? null
            : await request.arrayBuffer(),
        redirect: "manual",
      });

      const newHeaders = new Headers(response.headers);

      // Add CORS headers on the way back
      Object.entries(CORS_HEADERS).forEach(([key, value]) => {
        newHeaders.set(key, value);
      });

      return new Response(response.body, {
        status: response.status,
        statusText: response.statusText,
        headers: newHeaders,
      });
    } catch (error) {
      return new Response(
        JSON.stringify({
          error: "Proxy Error",
          message: error instanceof Error ? error.message : String(error),
        }),
        {
          status: 500,
          headers: {
            "Content-Type": "application/json",
            ...CORS_HEADERS,
          },
        }
      );
    }
  },
};
6. Click on deploy on top right, choose deploy. After deploying go back where edit code button was there. [you can access it by left sidebar as well on home, by clicking on workers and pages option under the compute option, look for supabase proxy or whatever name you gave, click on that name or three dots and choose view settings, that edit code page will appear]
7. Now, click on settings on right of observability
8. Click on add button in domain and routes section, and choose custom domain, enter api.yourapp.com, no need to add https or www. [yourapp.com domain dns provider should be cloudflare only], it will show whether that subdomain is available or not, if available click on add domain and cloudflare will automatically create a cname for the subdomain.
Now any request from the browser to `https://api.yourapp.com/...` will hit this Worker.
3.3. Configure Worker environment variables
Now, go to settings again, and right below the domain and routes, there is variable and secrets option, click on add button available in that section and add these two variables:
First Variable:
- Type: Text
- Variable Name: SUPABASE_URL
- Value: https://<project-ref>.supabase.co(your original Supabase project URL)
Second Variable:
- Type: Secret
- Variable Name: SUPABASE_ANON_KEY
- Value: Your Supabase anon API key (the same one you expose in your frontend).These are used only server‑side in the Worker.
These never leave Cloudflare; they’re only used server‑side in the Worker.
Note: You will get 100k daily requests on free plan which is more than enough if you dont have large amount of users. You can always buy the 5 dollar workers plan to increase the limits to 10 million monthly which is around 3x of free workers plan.
And dont forget to set usage limit if you are planning to take 5 dollar worker plan, in case of ddos attack, you can end up getting a huge bill.
4. Fix Google auth when jio blocks Supabase's redirect
Even after proxying, there’s one more “Supabase down on Jio” trap:
- supabase.auth.signInWithOAuth({ provider: 'google' }) uses Supabase’s own redirect flow:
- Browser → api.yourapp.com/auth/v1/authorize (proxy → Supabase).
- Supabase → Google (account picker).
- Google → https://<project>.supabase.co/auth/v1/callback.
That final callback is back to the blocked supabase.co domain, so on Jio the login still fails. To fix this, you must:
1. Stop using signInWithOAuth on web.
2. Use Google’s JS / implicit flow to get an ID token directly on your domain.
3. Hand that ID token to Supabase via signInWithIdToken over the proxy.
4.1 New Google web auth utility: googleWebAuth.ts
File:
- src/utils/googleWebAuth.ts
What it does:
- Implements the Google implicit/ID‑token flow on our own domain instead of sending users through Supabase’s hosted OAuth redirect.
- Builds a URL like:
const GOOGLE_AUTH_ENDPOINT = "https://accounts.google.com/o/oauth2/v2/auth";

export function startGoogleWebOAuth() {
  if (typeof window === "undefined") return;

  const clientId = import.meta.env.VITE_GOOGLE_WEB_CLIENT_ID;
  if (!clientId) {
    console.error("[GoogleWebAuth] VITE_GOOGLE_WEB_CLIENT_ID is not set");
    return;
  }

  const redirectUri = `${window.location.origin}/auth/google`;

  const nonce =
    (window.crypto && "randomUUID" in window.crypto
      ? window.crypto.randomUUID()
      : Math.random().toString(36).slice(2)) || "";

  const params = new URLSearchParams({
    client_id: clientId,
    redirect_uri: redirectUri,
    response_type: "id_token",
    scope: "openid email profile",
    nonce,
    prompt: "select_account",
  });

  const authUrl = `${GOOGLE_AUTH_ENDPOINT}?${params.toString()}`;
  window.location.href = authUrl;
}- On web, all “Sign in with Google” buttons now call startGoogleWebOAuth() instead of supabase.auth.signInWithOAuth.
This ensures Google only ever redirects back to /auth/google on your own domain, not *.supabase.co.
Google callback page: AuthGoogleCallback.tsx
File:
- src/pages/AuthGoogleCallback.tsx
What it does:
- Handles the /auth/google route we registered in Google Cloud Console.
- Reads the id_token from the URL hash (#id_token=...).
- Calls supabase.auth.signInWithIdToken({ provider: "google", token: idToken }) using the proxied Supabase client (so the POST goes to https://api.metefy.com/auth/v1/token?grant_type=id_token).
- On success, redirects the user back to the correct place (profile page, found items map, etc.), based on a localStorage flag we set before starting auth.
import { useEffect, useState } from 'react';
import { useNavigate, useSearchParams } from 'react-router-dom';
import { supabase } from '@/integrations/supabase/client';
import { useToast } from '@/components/ui/use-toast';

const OAUTH_SOURCE_KEY = 'app_oauth_source';
const REDIRECT_AFTER_LOGIN_KEY = 'app_redirect_after_login';

export default function AuthGoogleCallback() {
  const navigate = useNavigate();
  const [searchParams] = useSearchParams();
  const { toast } = useToast();
  const [message, setMessage] = useState('Completing Google sign in...');
  const [isProcessing, setIsProcessing] = useState(true);
  const [error, setError] = useState<string | null>(null);

  useEffect(() => {
    const completeAuth = async () => {
      try {
        const hash = window.location.hash || '';
        const hashParams = new URLSearchParams(
          hash.startsWith('#') ? hash.slice(1) : hash
        );

        const idToken = hashParams.get('id_token');

        console.log('[AuthGoogleCallback] Hash present:', !!hash);
        console.log('[AuthGoogleCallback] ID token present:', !!idToken);

        if (!idToken) {
          throw new Error('No ID token found in callback URL');
        }

        // Decode the ID token payload to extract the nonce claim (optional)
        let tokenNonce: string | undefined;
        try {
          const parts = idToken.split('.');
          if (parts.length === 3) {
            const payloadBase64 = parts[1]
              .replace(/-/g, '+')
              .replace(/_/g, '/')
              .padEnd(parts[1].length + (4 - (parts[1].length % 4)) % 4, '=');
            const json = atob(payloadBase64);
            const parsed = JSON.parse(json);
            if (typeof parsed.nonce === 'string') {
              tokenNonce = parsed.nonce;
            }
          }
        } catch (e) {
          console.warn('[AuthGoogleCallback] Failed to decode ID token nonce', e);
        }

        const { data, error } = await supabase.auth.signInWithIdToken({
          provider: 'google',
          token: idToken,
          nonce: tokenNonce, // can be omitted if you enabled "Skip nonce checks" in Supabase
        });

        if (error) {
          console.error('[AuthGoogleCallback] signInWithIdToken error:', error);
          throw error;
        }

        if (!data.session || !data.user) {
          throw new Error('No session returned from Supabase');
        }

        setMessage('Sign in successful! Redirecting...');

        const source = window.localStorage.getItem(OAUTH_SOURCE_KEY);
        let redirectPath = '/profile';

        // Example: customize redirect per source
        if (source === 'hero') {
          redirectPath = '/';
        } else if (source === 'feature') {
          redirectPath = '/some-feature';
        }

        window.localStorage.removeItem(REDIRECT_AFTER_LOGIN_KEY);
        window.localStorage.removeItem(OAUTH_SOURCE_KEY);

        setTimeout(() => navigate(redirectPath, { replace: true }), 2000);
      } catch (err: any) {
        console.error('[AuthGoogleCallback] Error:', err);
        setError(err?.message || 'Failed to complete Google sign in');
        setMessage('Authentication failed. Redirecting...');

        try {
          window.localStorage.removeItem(REDIRECT_AFTER_LOGIN_KEY);
          window.localStorage.removeItem(OAUTH_SOURCE_KEY);
        } catch {
          // Ignore storage errors
        }

        toast({
          title: 'Authentication Error',
          description: err?.message || 'Failed to complete sign in',
          variant: 'destructive',
        });

        setTimeout(() => navigate('/auth', { replace: true }), 3000);
      } finally {
        setIsProcessing(false);
      }
    };

    const timer = setTimeout(completeAuth, 500);
    return () => clearTimeout(timer);
  }, [navigate, searchParams, toast]);

  return (
    <div className="flex items-center justify-center h-screen bg-background">
      <div className="text-center max-w-md px-4">
        <h2 className="text-xl font-semibold mb-2">{message}</h2>
        {error && (
          <div className="mt-4 p-4 bg-red-50 border border-red-200 rounded-lg">
            <p className="text-red-800 font-medium">Error:</p>
            <p className="text-red-600 text-sm mt-1">{error}</p>
          </div>
        )}
        <p className="text-gray-600 mt-2">
          {isProcessing
            ? 'Please wait while we process your authentication...'
            : ''}
        </p>
      </div>
    </div>
  );
}
By doing this, the entire web Google login path is:
- Browser ↔ yourapp.com / api.yourapp.com
- Browser ↔ accounts.google.com
No browser redirect back to supabase.co, so Jio can’t break the flow.
5. Where we swapped out Supabase’s Google OAuth
We then updated all web “Sign in with Google” entry points to use the new helper:
Files updated:
- src/pages/Auth.tsx – Auth page Google button
- src/components/auth/AuthDrawer.tsx – Axuth drawer Google button
Logic:
- On native (Capacitor) we kept using @codetrix-studio/capacitor-google-auth + supabase.auth.signInWithIdToken directly.
- On web we changed:
// Before (example)
await supabase.auth.signInWithOAuth({ provider: "google" });

// After
startGoogleWebOAuth();
This ensures all web Google sign‑ins go through our /auth/google callback flow instead of Supabase’s hosted OAuth (and thus never hit *.supabase.co in the browser).
4. Supabase config: point everything at api.yourapp.com
Files:
- .env
- .env.example
- src/integrations/supabase/client.ts (or wherever you create your Supabase client)
What we did:
- Changed the Supabase URL env to the proxy domain:
VITE_SUPABASE_URL=https://api.yourapp.com
VITE_SUPABASE_ANON_KEY=your-anon-key-here
VITE_GOOGLE_WEB_CLIENT_ID=your-google-web-client-id-here
5. Google Cloud Console Settings
To support this new flow we also need to do some changes in authorized redirect urls Google Cloud Console (OAuth client):
Added Authorized JavaScript origins:
- https://www.yourapp.com
- https://yourapp.com
- https://yourapp.vercel.app
- http://localhost:8080, http://localhost:5173 etc. (for dev)
Added Authorized redirect URIs:
- https://www.yourapp.com/auth/google
- https://yourapp.com/auth/google
- http://localhost:8080/auth/google (and similar for dev)
Supabase dashboard URLs
In Supabase → Authentication → URL configuration, set:
- Site URL: https://www.yourapp.com
Additional Redirect URLs
- https://www.yourapp.com/auth/google
- https://yourapp.com/auth/google
Local development (Vite dev server, etc.)
- http://localhost:5173/auth/google
- (If you use another port, add that too, e.g. http://localhost:8080/auth/google)
These are the URLs your browser will actually hit after Google redirects back with the ID token.
Supabase Dashboard → Authentication → Providers → Google:
- Set Client IDs to the same web client ID used in VITE_GOOGLE_WEB_CLIENT_ID.
- Optionally turned on “Skip nonce checks” to avoid strict ID‑token nonce validation when we don’t explicitly pass the same nonce value back.
6. Vercel environment variables (what to change)
In Vercel, go to Project → Settings → Environment Variables and set:
- VITE_SUPABASE_URL: https://api.yourapp.com
This points the Supabase JS client to your Cloudflare Worker proxy instead of https://<project>.supabase.co.
- VITE_SUPABASE_ANON_KEY: your-supabase-anon-key
Same anon key you see in Supabase → Settings → API
- VITE_GOOGLE_WEB_CLIENT_ID: your-google-oauth-web-client-id
The Client ID from your Google Cloud “Web application” OAuth client.
Keep any existing ones you already use.
After adding/updating these in Vercel, redeploy your app so the new env values are picked up by the build.
Email/password sign‑up + sign‑in (forms calling Supabase from your app)
No extra special setup beyond what you already did for api.yourapp.com.
As long as:
- Your frontend uses VITE_SUPABASE_URL=https://api.yourapp.com and the correct anon key.
- Supabase Auth → URL configuration has your app URLs (e.g. https://www.yourapp.com) as Site URL / Redirect URLs.
Then supabase.auth.signUp({ email, password }), signInWithPassword, etc. all go through api.metefy.com and bypass the Jio block automatically.
Supabase “magic link” / email-OTP links sent by Supabase
This is the tricky part: Supabase’s own magic link / confirmation / reset emails contain links like https://<project>.supabase.co/auth/v1/verify?...
If the ISP (like Jio) blocks *.supabase.co, then:
- Those email links themselves will fail to open before they even redirect to your site.
- Your Cloudflare Worker (api.yourapp.com) does not automatically fix these email links, because they don’t go through your domain.
So, Users don’t have extra “setup” they can do on your current worker-based setup to fix Supabase’s email links.
To fix email-based flows, they have to either:
- Use Supabase’s official Custom Domain feature (so emails use their own domain instead of supabase.co), or
- Stop relying on Supabase‑generated links and:
- Send their own emails (e.g. via Resend/Sendgrid/etc.) with links to their own domain (like https://yourapp.com/auth/verify?...), and
- Implement the verification logic themselves (e.g. custom endpoint / Edge Function using the service role key or password reset tokens stored in DB).
If someone is using Resend (or any external email provider)
- If they already send their own emails (not using Supabase’s built‑in email templates) and the links in those emails point to their own domain, then:
- No extra ISP‑specific setup is needed.
- Their verification / magic‑link endpoint should:
- Live on their own domain (https://app.example.com/...),
- Talk to Supabase via the proxy URL (https://api.metefy.com‑style).
- In that setup, Jio’s block on *.supabase.co does not matter, because:
- Emails never point at supabase.co,
- All backend calls go through the proxy domain.
Final thought
Supabase isn’t the problem here; Jio’s aggressive blocking of *.supabase.co is. By hiding Supabase behind your own api.yourapp.com domain with a Cloudflare Worker, and by swapping Google OAuth to an ID‑token based flow, you route every browser call through infrastructure you control and completely sidestep the Jio/JioFiber block.
If you’re a dev on the Supabase free tier dealing with users complaining that your app is “down on Jio”, this setup is a free, production‑grade way to make your auth, APIs, and logins resilient without changing your database or abandoning Supabase.